
Automating Face Morphometrics Analysis with MediaPipe and Python
![]()
In this blog, we’ll walk through a practical workflow for downloading random synthetic faces, converting image formats, applying facial landmark detection with MediaPipe, and performing basic morphometric analysis. We’ll also visualize results to explore variations in facial features, such as interocular distances, across random faces.
This tutorial assumes familiarity with Python, OpenCV, and basic image processing concepts.
Installing Dependencies
We use MediaPipe, OpenCV, NumPy, Pillow, Matplotlib, and Plotly. First, install MediaPipe (the rest are standard in most Python environments).
#Run this block more than once
!pip install mediapipe
import mediapipe as mp
Downloading Random Faces
We can fetch synthetic faces from thispersondoesnotexist.com and save them locally.
import requests

# Download 3 random faces
image_paths = ["/content/frontal1.jpg", "/content/frontal2.jpg", "/content/frontal3.jpg"]
for path in image_paths:
    resp = requests.get("https://thispersondoesnotexist.com/")
    if resp.status_code == 200:
        with open(path, "wb") as f:
            f.write(resp.content)
This creates three JPG images that we can process later.
Viewing Images in Jupyter Notebook
We can read image files as bytes and display them inline.
import cv2, numpy as np, mediapipe as mp
from PIL import Image
from io import BytesIO
from IPython.display import Image as IPyImage

def img_file_path_to_img_bytes(file_path):
  with open(file_path, 'rb') as f:
    return f.read()

img_bytes = img_file_path_to_img_bytes('frontal1.jpg')
IPyImage(img_bytes)
Converting JPG to PNG
Sometimes downstream processing works better with PNGs due to lossless compression.
from PIL import Image

def jpg_to_png(jpg_path, png_path):
  """Converts a JPG image to PNG format."""
  try:
    img = Image.open(jpg_path)
    img.save(png_path, 'PNG')
    print(f"Successfully converted {jpg_path} to {png_path}")
  except Exception as e:
    print(f"Error converting {jpg_path}: {e}")

# Example usage:
jpg_file = '/content/frontal1.jpg'
png_file = '/content/frontal1.png'
jpg_to_png(jpg_file, png_file)

img_bytes = img_file_path_to_img_bytes('frontal1.png')
IPyImage(img_bytes)
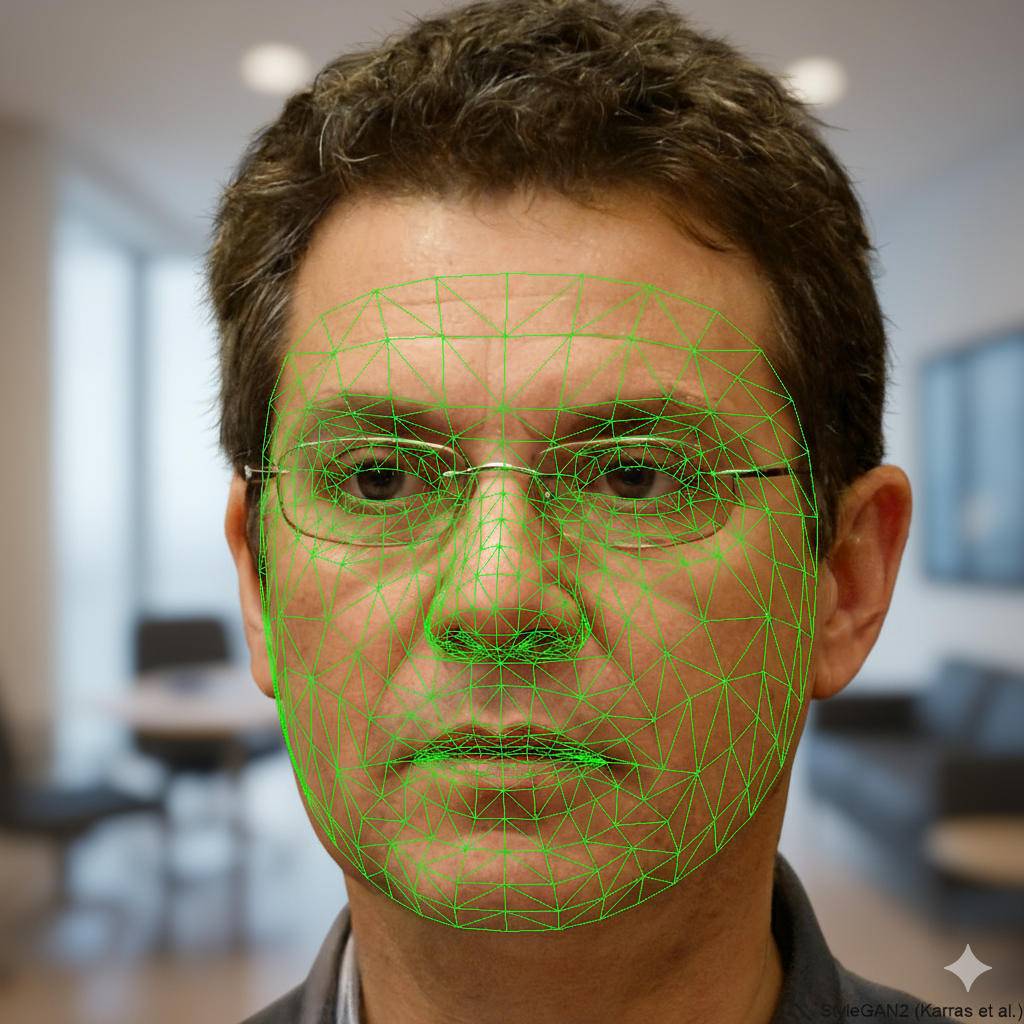
Applying MediaPipe Face Mesh
MediaPipe Face Mesh allows detecting 468 3D facial landmarks. We can overlay these landmarks for visualization.
def img_bytes_to_meshed_img_bytes(img_bytes):
    # Decode image from raw bytes
    img_array = np.frombuffer(img_bytes, dtype=np.uint8)
    image = cv2.imdecode(img_array, cv2.IMREAD_UNCHANGED)

    if image is None:
        raise ValueError("Could not decode image from bytes")

    # Handle alpha channel or grayscale
    if image.ndim == 3 and image.shape[2] == 4:
        image = cv2.cvtColor(image, cv2.COLOR_BGRA2BGR)
    elif image.ndim == 2:
        image = cv2.cvtColor(image, cv2.COLOR_GRAY2BGR)

    # Convert BGR → RGB
    img_rgb = cv2.cvtColor(image, cv2.COLOR_BGR2RGB)

    # Run MediaPipe Face Mesh
    mp_face_mesh = mp.solutions.face_mesh
    with mp_face_mesh.FaceMesh(static_image_mode=True, max_num_faces=1, refine_landmarks=True) as face_mesh:
        results = face_mesh.process(img_rgb)

    # Copy for drawing
    output_img_rgb = img_rgb.copy()
    if results.multi_face_landmarks:
        mp_drawing = mp.solutions.drawing_utils
        for face_landmarks in results.multi_face_landmarks:
            mp_drawing.draw_landmarks(
                image=output_img_rgb,
                landmark_list=face_landmarks,
                connections=mp_face_mesh.FACEMESH_TESSELATION,
                landmark_drawing_spec=None,
                connection_drawing_spec=mp_drawing.DrawingSpec(
                    color=(0, 255, 0), thickness=1, circle_radius=0)
            )

    # Convert result back to PNG bytes
    img_pil = Image.fromarray(output_img_rgb)
    buf = BytesIO()
    img_pil.save(buf, format="PNG")
    buf.seek(0)
    return buf.getvalue()

# Example usage
img_mesh_bytes = img_bytes_to_meshed_img_bytes(img_bytes)
IPyImage(img_mesh_bytes)  # display in notebook
Extracting Morphometric Measurements
We can measure distances between landmarks to obtain facial morphometrics such as interocular distance, nose width, or mouth width.
from math import dist
import json

def png_bytes_to_morphometric_json(png_bytes):
    # Decode image from bytes
    png_array = np.frombuffer(png_bytes, dtype=np.uint8)
    image = cv2.imdecode(png_array, cv2.IMREAD_UNCHANGED)

    if image.shape[-1] == 4:
        image = cv2.cvtColor(image, cv2.COLOR_BGRA2BGR)
    elif len(image.shape) == 2:
        image = cv2.cvtColor(image, cv2.COLOR_GRAY2BGR)

    img_rgb = cv2.cvtColor(image, cv2.COLOR_BGR2RGB)

    # Initialize Mediapipe FaceMesh
    mp_face_mesh = mp.solutions.face_mesh
    with mp_face_mesh.FaceMesh(
        static_image_mode=True,
        max_num_faces=1,
        refine_landmarks=True
    ) as face_mesh:

        results = face_mesh.process(img_rgb)

    if not results.multi_face_landmarks:
        return json.dumps({"error": "No face detected"})

    # Get image dimensions
    h, w, _ = img_rgb.shape
    face_landmarks = results.multi_face_landmarks[0]

    # Convert normalized landmarks to pixel coordinates
    landmarks = [(int(lm.x * w), int(lm.y * h)) for lm in face_landmarks.landmark]

    # Example morphometric measurements
    # Define some standard landmarks based on Mediapipe indices
    measurements = {}

    def euclidean(p1, p2):
        return dist(landmarks[p1], landmarks[p2])

    # Sample morphometrics
    measurements["interocular_distance"] = euclidean(33, 263)  # Eye corners
    measurements["eye_width_left"] = euclidean(133, 33)
    measurements["eye_width_right"] = euclidean(362, 263)
    measurements["nose_width"] = euclidean(97, 326)
    measurements["nose_length"] = euclidean(1, 2)
    measurements["mouth_width"] = euclidean(61, 291)
    measurements["face_width"] = euclidean(234, 454)
    measurements["face_height"] = euclidean(10, 152)

    # You can normalize or return raw pixels depending on your use case
    return json.dumps(measurements)

# Example usage
png_bytes_to_morphometric_json(img_bytes)
Automating Face Download and Analysis
We can wrap random face downloads and analysis into a loop to collect statistics:
import requests
import random

def get_random_face_bytes():
    """
    Downloads a random face from thispersondoesnotexist.com
    and returns it as raw image bytes.
    """
    url = "https://thispersondoesnotexist.com/"
    resp = requests.get(url)
    if resp.status_code != 200:
        raise RuntimeError(f"Failed to download image, status code: {resp.status_code}")
    return resp.content

# Example usage
img_bytes = get_random_face_bytes()

# Display in notebook
from IPython.display import Image as IPyImage
IPyImage(img_bytes)
Collecting Interocular Distances from 100 Random Faces
import json

io_distances = []

for i in range(100):
    try:
        img_bytes = get_random_face_bytes()
        morpho_json = png_bytes_to_morphometric_json(img_bytes)
        morpho = json.loads(morpho_json)  # <-- parse JSON

        if "interocular_distance" in morpho:
            io_distances.append(morpho["interocular_distance"])
    except Exception as e:
        print(f"Skipping face {i} due to error: {e}")
Visualizing Morphometric Distributions
Matplotlib Histogram
import matplotlib.pyplot as plt
# Plot histogram
plt.figure(figsize=(10, 6))
plt.hist(io_distances, bins=15, color='skyblue', edgecolor='black')
plt.title("Histogram of Interocular Distances (100 Random Faces)")
plt.xlabel("Interocular Distance (pixels)")
plt.ylabel("Count")
plt.show()
Interactive Plotly Histogram
import plotly.graph_objects as go

fig = go.Figure()

fig.add_trace(go.Histogram(
    x=io_distances,
    nbinsx=15,
    marker_color='skyblue',
    marker_line_color='black',
    marker_line_width=1
))

fig.update_layout(
    title="Histogram of Interocular Distances (100 Random Faces)",
    xaxis_title="Interocular Distance (pixels)",
    yaxis_title="Count",
    bargap=0.1,
    template="plotly_white"
)

fig.show()
Conclusion
In this post, we demonstrated:
- Downloading random synthetic faces
- Converting image formats (JPG → PNG)
- Applying MediaPipe Face Mesh for landmark detection
- Calculating basic morphometric features
- Aggregating statistics and visualizing distributions
This pipeline provides a solid foundation for large-scale facial morphometric analysis or synthetic dataset exploration. From here, you could expand to 3D face modeling, automated feature normalization, or machine learning pipelines.
